Dynamic lighting과 shading에 대해 알아보자.


3차원 물체에 빛을 쏘아 명암을 입히려 할때, 이를 어떻게 구현할까?
빛을 shading하는 기법에도 여러가지가 있는데, 그 중 가장 단순한 flat shading부터 살펴보자.
flat shading은 단순히 각 폴리곤들마다 받는 빛을 계산해 폴리곤별로 색을 렌더링해주는 기법이다.
더 자세히 살펴보기 전에, 우선 Directional light에 대해 알아보자.

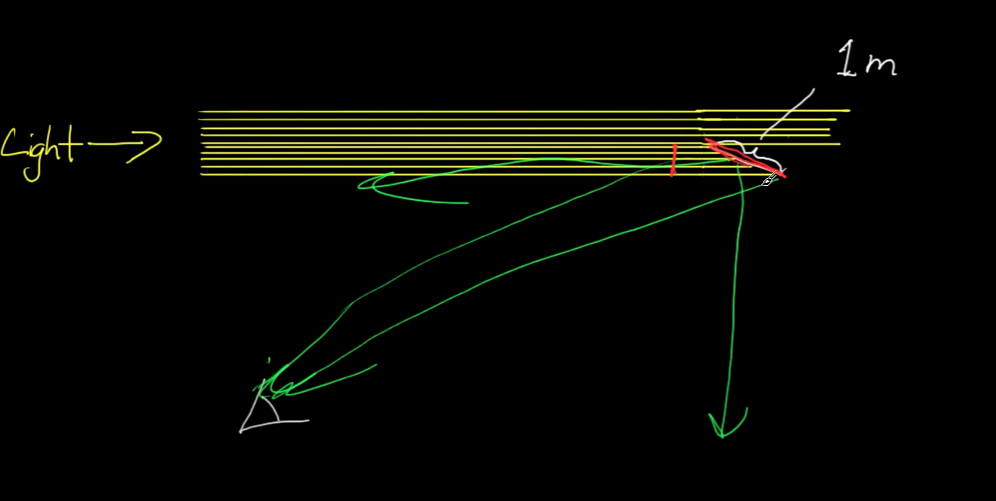
어떤 광원으로부터 쏘아진 광자가 물체에 다다를 때 광원까지의 거리가 멀 수록 물체에 부딪히는 광자들이 이루는 각의 크기가 작아짐을 볼 수 있다.
이는 달리말해 광원의 거리가 무한히 멀다면 이 각이 0도에 수렴하고, 이는 즉 모든 빛이 같은 방향에서 들어온다는 것을 의미한다.
이러한 빛을 우리는 Directional light이라고 하며, 태양빛과 같이 먼 거리로부터의 빛을 이러한 형태로 나타낼 수 있다.
그렇다면 이런 Directional light로부터 빛을 받고 있는 어떤 물체 표면의 밝기가 어떻게 결정되는지 그 과정을 살펴보자.

당연한 말이지만, 빛의 세기가 셀 수록(광원으로부터 나오는 photon들이 많을 수록) 표면에 맞고 반사되어 눈으로 들어가는 광자의 갯수가 많아지므로 더 밝게 보인다.
이때 표면의 각을 45도로 만들어 광원과 부딪히는 표면적의 면적을 반으로 줄이면 이전에 비해 절반만큼의 광자가 맞고 튕겨져 눈으로 들어오는 것을 알 수 있다. 즉 이전 90도를 이룰 때에 비해 절반만큼 밝다.
(아예 90도 회전시킬 경우에는 광자에 전혀 맞지 않기 때문에 완전히 어둡게 보인다.)
즉, 우리는 물체의 표면이 광원으로부터 쏘아져나오는 빛(직선)과 이루는 각도를 바탕으로 그 물체의 밝기를 구할 수 있다.

이 원리를 이용해 3차원 물체에 밝기에 기반해 색을 입히면 우리 뇌가 3차원 모델을 입체적으로 인식할 수 있게 된다.
다시 본론으로 들어와서, 원리를 알았으니 이제 이를 구현해보자.
I를 빛의 세기(intensity)라고 하고 이를 10/m(10만큼의 빛이 meter당 들어온다)라고 나타내자.
물체의 표면 길이가 1m(편의상 2차원상에 존재하는 1차원 벽면이라 생각하자. 원리는 3차원 표면적에서도 완전히 동일하다.)라고 하고, 빛 방향에 대해 pi/6(30도)만큼 시계방향으로 기울어져 있다고 할 때, 실제로 빛이 부딪히는 물체의 표면적은 1 * sin(pi/6)임을 쉽게 구할 수 있다.
즉 어떤 표면의 밝기 = I * sin(세타) 라는 일반식을 쉽게 구할 수 있다.

그런데 sin함수는 컴퓨터 상에선 다소 무거운 함수라는 단점이 있다.
때문에 우리는 I * sin(세타)를 훨씬 연산이 빠른 벡터의 내적을 활용해 나타낼 것이다.
dot(v1, v2) = ||v1|| ||v2|| cos(세타)임을 활용해보자. (길이x길이x코사인세타)
우선 빛 방향의 벡터 및 물체 표면의 normal vector(법선벡터)를 모두 normalize해서 길이를 1로 만들면, 이 둘을 내적한 값은 cos(빛과 법선의 각도) 가 된다.

이때 표면이 빛과 이루는 각도가 세타일 때, 빛과 법선의 각도는 (pi/2 - 세타)로 나타낼 수 있다.
즉 dot(빛 벡터, 표면의 normal vector) = dot(light,normal) = cos(pi/2 - 세타)이다.
여기서 놀랍게도 cos(pi/2 - 세타)는 sin(세타)와 값이 동일하다! 때문에 사인 대신 두 벡터의 내적으로 같은 결과값을 얻을 수 있다.
정리하면, I * sin(세타) = I * dot(light,normal)이다!

구현할 때 딱 한가지 주의해야 할 점은 normal과 빛이 서로 둔각을 이루기 때문에 우리가 원하는 결과를 얻으려면 한쪽의 방향을 거꾸로 뒤집어야 한다는 점이다. 둘 중 어떤 걸 뒤집던 상관은 없다.
이걸 뒤집은 다음에 그 뒤집어진 벡터와 기존 벡터를 내적해서 결과를 구해도 되지만, 사실 어떤 둔각의 코사인값을 알면 그 예각의 코사인값은 그 값 * -1이라는 것을 알고 있기 때문에(코사인 그래프를 생각해보면 pi/2지점으로 점대칭이다) 그냥 벡터를 굳이 뒤집지 말고 결과값에만 -1을 곱해줘도 된다.

때문에 최종적으로는 다음과 같은 일반식이 나온다.

이를 실제로 구현하기 위해서 우리는 각 폴리곤들의 normal 값이 필요한데, 이 normal 값을 모델의 어느 부분에 저장하는지에 대한 문제가 발생한다.
쉽게 생각하면 그냥 각 vertex들에 저장하면 될 듯 한데, 이러면 중복되는 indices들의 경우 자기 normal이 아닌 vertex를 참조해버리는 등의 문제가 발생할 수 있다.
그렇다고 이걸 해결하겠다고 vertex index를 사용 안하고 그냥 각 폴리곤마다 전부 개별적인 vertex를 사용해버리면 되긴 되지만 메모리 낭비가 막심하다. (같은 normal vector가 세 정점에 똑같이 저장되니까)
때문에 우리는 Geometry shader를 사용해 각 폴리곤마다 동적으로 normal을 연산해주는 방식을 사용해 normal을 얻을 수 있다. (이전에도 다룬 방식. 다만 실제 그래픽스 파이프라인에서는 Geometry shader 대신 그냥 메모리를 더 쓰더라도 vertex를 중복해서 저장하는 방법을 사용하는 듯 하다.)
이렇게 얻은 normal을 사용해 빛에 따른 물체의 색상을 계산하는 부분의 경우, 다음과 같은 연산을 통해 얻을 수 있다. (본 코드는 Geometry shader에서 처리하는 연산을 담고 있는 .gs() 구현부이다)
// GeometryFlatEffect.h
Triangle<Output> operator()( const VertexShader::Output& in0,const VertexShader::Output& in1,const VertexShader::Output& in2,size_t triangle_index ) const
        {
            // calculate face normal
      // 동적으로 normal vector(법선벡터)를 구하는 코드부분이다.
      // %를 외적 기호로 오버로딩했음에 유의.
      // 원리는 벡터간의 외적을 이용한 것으로, 블로그 외적 글 참고
            const auto n = ((in1.pos - in0.pos) % (in2.pos - in0.pos)).GetNormalized();

      // Geometry shader가 처리되는 시점에서는 이미 물체의 각 정점들이 회전한 상태임에 유의.
      // 즉 앞서 normal vector를 동적으로 계산하는 과정에서 이미 폴리곤의 정점들도 회전된 상태이므로 굳이 normal에 별도로 rotation matrix를 곱해주지 않아도 된다.
            // calculate intensity based on angle of incidence
            const auto d = diffuse * std::max( 0.0f,-n * dir ); // 앞서 언급한 이유(둔각)때문에 -1을 곱한다.

            // add diffuse+ambient, filter by material color, saturate and scale
      // 앞서 구한 d(diffuse)가 directional light의 세기 및 색상을 나타내므로,
      // 물체가 받는 빛의 총합은 d + ambient이다.
      // Color의 GetHadamard() 메소드를 이용해 색상과 빛을 아다마르 곱 해준다. (아다마르 곱 - 아래 사진 참조)
      // 빛과 색이 만났을 때 색의 변화를 표현하는 과정으로, 그냥 각 값을 곱해주는 것에 불과하다.
      // 곱한 값은 .Saturate()로 0.0~1.0으로 clamp해주고 여기에 다시 255를 곱해주어 RGB 범위를 맞춰준다.
            const auto c = Color( color.GetHadamard( d + ambient ).Saturate() * 255.0f );
            return{ {in0.pos,c},{in1.pos,c},{in2.pos,c} };
        }
<아다마르 곱 - 매우 단순하다. 그냥 각 원소를 곱해 새 행렬을 만드는 과정이다.>
전체 코드로 살펴보자.
// GeometryFlatEffect.h
#pragma once

#include "Pipeline.h"
#include "DefaultVertexShader.h"
#include "DefaultGeometryShader.h"

// flat shading with face normals calculated in gs
class GeometryFlatEffect
{
public:
    // the vertex type that will be input into the pipeline
    class Vertex
    {
    public:
        Vertex() = default;
        Vertex( const Vec3& pos )
            :
            pos( pos )
        {}
        Vertex( const Vec3& pos,const Vertex& src )
            :
            pos( pos )
        {}
        Vertex& operator+=( const Vertex& rhs )
        {
            pos += rhs.pos;
            return *this;
        }
        Vertex operator+( const Vertex& rhs ) const
        {
            return Vertex( *this ) += rhs;
        }
        Vertex& operator-=( const Vertex& rhs )
        {
            pos -= rhs.pos;
            return *this;
        }
        Vertex operator-( const Vertex& rhs ) const
        {
            return Vertex( *this ) -= rhs;
        }
        Vertex& operator*=( float rhs )
        {
            pos *= rhs;
            return *this;
        }
        Vertex operator*( float rhs ) const
        {
            return Vertex( *this ) *= rhs;
        }
        Vertex& operator/=( float rhs )
        {
            pos /= rhs;
            return *this;
        }
        Vertex operator/( float rhs ) const
        {
            return Vertex( *this ) /= rhs;
        }
    public:
        Vec3 pos;
    };
    // default vs rotates and translates vertices
    // does not touch attributes
    typedef DefaultVertexShader<Vertex> VertexShader;
    // calculate color based on face normal calculated from
    // cross product of geometry--no interpolation of color
    class GeometryShader
    {
    public:
        class Output
        {
        public:
            Output() = default;
            Output( const Vec3& pos )
                :
                pos( pos )
            {}
            Output( const Vec3& pos,const Output& src )
                :
                color( src.color ),
                pos( pos )
            {}
            Output( const Vec3& pos,const Color& color )
                :
                color( color ),
                pos( pos )
            {}
            Output& operator+=( const Output& rhs )
            {
                pos += rhs.pos;
                return *this;
            }
            Output operator+( const Output& rhs ) const
            {
                return Output( *this ) += rhs;
            }
            Output& operator-=( const Output& rhs )
            {
                pos -= rhs.pos;
                return *this;
            }
            Output operator-( const Output& rhs ) const
            {
                return Output( *this ) -= rhs;
            }
            Output& operator*=( float rhs )
            {
                pos *= rhs;
                return *this;
            }
            Output operator*( float rhs ) const
            {
                return Output( *this ) *= rhs;
            }
            Output& operator/=( float rhs )
            {
                pos /= rhs;
                return *this;
            }
            Output operator/( float rhs ) const
            {
                return Output( *this ) /= rhs;
            }
        public:
            Vec3 pos;
            Color color;
        };
    public:
        Triangle<Output> operator()( const VertexShader::Output& in0,const VertexShader::Output& in1,const VertexShader::Output& in2,size_t triangle_index ) const
        {
            // calculate face normal
            const auto n = ((in1.pos - in0.pos) % (in2.pos - in0.pos)).GetNormalized();
            // calculate intensity based on angle of incidence
            const auto d = diffuse * std::max( 0.0f,-n * dir );
            // add diffuse+ambient, filter by material color, saturate and scale
            const auto c = Color( color.GetHadamard( d + ambient ).Saturate() * 255.0f );
            return{ {in0.pos,c},{in1.pos,c},{in2.pos,c} };
        }
        void SetDiffuseLight( const Vec3& c )
        {
            diffuse = { c.x,c.y,c.z };
        }
        void SetAmbientLight( const Vec3& c )
        {
            ambient = { c.x,c.y,c.z };
        }
        void SetLightDirection( const Vec3& dl )
        {
            assert( dl.LenSq() >= 0.001f );
            dir = dl.GetNormalized();
        }
        void SetMaterialColor( Color c )
        {
            color = Vec3( c );
        }
    private:
        Mat3 rotation;
        Vec3 translation;
    // directional light 빛의 방향이다.
        Vec3 dir = { 0.0f,0.0f,1.0f };
        // this is the intensity if direct light from source
        // color light so need values per color component
    // diffuse는 directional light의 색상을 나타낸다
        Vec3 diffuse = { 1.0f,1.0f,1.0f };
        // this is intensity of indirect light that bounces off other obj in scene
        // color light so need values per color component
    // ambient light의 색상을 나타낸다. 반드시 사용할 필요는 없으나 자연스러운 결과를 위해 사용한다.
    // 현실에 존재하는, 주변 사물들로부터 튕겨나와 모든 방향으로부터 받는 빛을 의미한다.
        Vec3 ambient = { 0.1f,0.1f,0.1f };
        // color of material (how much light of each color is reflected)
    // 물체 자체의 색상이다
        Vec3 color = { 0.8f,0.85f,1.0f };
    };
    // invoked for each pixel of a triangle
    // takes an input of attributes that are the
    // result of interpolating vertex attributes
    // and outputs a color
    class PixelShader
    {
    public:
        template<class Input>
        Color operator()( const Input& in ) const
        {
            return in.color;
        }
    };
public:
    VertexShader vs;
    GeometryShader gs;
    PixelShader ps;
};
잘 작동하는 것을 확인할 수 있다.
이렇게 만든 flat shading을 보다 더 복잡한 오브젝트에 적용해보자.
그러려면 복잡한 오브젝트가 필요한데, 지금까지 일일이 정점좌표를 찍어준 것처럼 만들수 도 물론 있기야 하겠지만 블렌더같은 더 편한 툴로 제작된 메쉬를 불러오는 게 훨씬 빠르다.
오늘은 그중 단순한 축에 속하는 .obj 파일 포맷으로 3차원 메쉬을 loading해보자.
정확히는 .obj를 로딩해주는 라이브러리를 프레임워크에 적용시켜보자.
라이브러리를 가져와 사용하는 과정은 사실 본 학습목표와 크게 관계있지 않고 사실 그냥 API를 맞춰주는 것에 불과하지만, 오픈소스 라이브러리를 적용하는 것에 익숙해질 필요가 있으므로 한번 살펴보는 게 권장된다.
또 해당 라이브러리 자체가 어떻게 동작하는지를 이해하고 직접 .obj loader를 시간날 때 제작해보는 것도 좋겠다.
라이브러리(tiny_obj_loader.h)를 사용하는 부분에 해당하는 코드는 본 노트 아래 첨부한다.
이렇게 토끼 3차원 메쉬를 로드해 렌더링하면 다음과 같은 결과가 나온다!


그런데 이 모델을 이리저리 회전시켜보면 모델의 중심점이 잘못 설정되어있음을 알 수 있는데, 이를 해결하기 위해 miniball이라는 라이브러리를 사용해보자.

사실 사용과정은 크게 중요치 않고, 원리를 이해하는 게 더 중요한데, 그리 복잡하지 않다. 해당 라이브러리는 어떤 모델의 모든 정점을 담을 수 있는 최소한의 구를 만들어주는데 그 구의 중심을 메쉬 자체의 중심점으로 사용하면 우리가 원하는 결과를 얻을 수 있다.
마찬가지로 라이브러리(Miniball.h)를 사용하는 부분에 해당하는 코드는 아래 첨부한다.
라이브러리 적용 코드
#pragma once

#include <vector>
#include "Vec3.h"
#include "tiny_obj_loader.h"
#include "Miniball.h"
#include <fstream>
#include <cctype>

template<class T>
class IndexedTriangleList
{
public:
    IndexedTriangleList() = default;
    IndexedTriangleList( std::vector<T> verts_in,std::vector<size_t> indices_in )
        :
        vertices( std::move( verts_in ) ),
        indices( std::move( indices_in ) )
    {
        assert( vertices.size() > 2 );
        assert( indices.size() % 3 == 0 );
    }
    static IndexedTriangleList<T> Load( const std::string& filename )
    {
        IndexedTriangleList<T> tl;

        // check first line of file to see if CCW winding comment exists
        bool isCCW = false;
        {
            std::ifstream file( filename );
            std::string firstline;
            std::getline( file,firstline );
            std::transform( firstline.begin(),firstline.end(),firstline.begin(),std::tolower );
            if( firstline.find( "ccw" ) != std::string::npos )
            {
                isCCW = true;
            }
        }

        // these will be filled by obj loading function
        using namespace tinyobj;
        attrib_t attrib;
        std::vector<shape_t> shapes;
        std::string err;

        // load/parse the obj file
        const bool ret = LoadObj( &attrib,&shapes,nullptr,&err,filename.c_str() );

        // check for errors
        if( !err.empty() && err.substr( 0,4 ) != "WARN" )
        {
            throw std::runtime_error( ("LoadObj returned error:" + err + " File:" + filename).c_str() );
        }
        if( !ret )
        {
            throw std::runtime_error( ("LoadObj returned false  File:" + filename).c_str() );
        }
        if( shapes.size() == 0u )
        {
            throw std::runtime_error( ("LoadObj object file had no shapes  File:" + filename).c_str() );
        }

        // extract vertex data
        // attrib.vertices is a flat std::vector of floats corresponding
        // to vertex positions, laid out as xyzxyzxyz... etc.
        // first preallocate required space in OUR std::vector
        tl.vertices.reserve( attrib.vertices.size() / 3u );
        // iterate over individual vertices, construct Vec3s in OUR vector
        for( int i = 0; i < attrib.vertices.size(); i += 3 )
        {
            tl.vertices.emplace_back( Vec3{
                attrib.vertices[i + 0],
                attrib.vertices[i + 1],
                attrib.vertices[i + 2]
            } );
        }

        // extract index data
        // obj file can contain multiple meshes, we assume just 1
        const auto& mesh = shapes[0].mesh;
        // mesh contains a std::vector of num_face_vertices (uchar)
        // and a flat std::vector of indices. If all faces are triangles
        // then for any face f, the first index of that faces is [f * 3n]
        tl.indices.reserve( mesh.indices.size() );
        for( size_t f = 0; f < mesh.num_face_vertices.size(); f++ )
        {
            // make sure there are no non-triangle faces
            if( mesh.num_face_vertices[f] != 3u )
            {
                std::stringstream ss;
                ss << "LoadObj error face #" << f << " has "
                    << mesh.num_face_vertices[f] << " vertices";
                throw std::runtime_error( ss.str().c_str() );
            }

            // load set of 3 indices for each face into OUR index std::vector
            for( size_t vn = 0; vn < 3u; vn++ )
            {
                const auto idx = mesh.indices[f * 3u + vn];
                tl.indices.push_back( size_t( idx.vertex_index ) );
            }

            // reverse winding if file marked as CCW
            if( isCCW )
            {
                // swapping any two indices reverse the winding dir of triangle
                std::swap( tl.indices.back(),*std::prev( tl.indices.end(),2 ) );
            }
        }

        return tl;
    }
    void AdjustToTrueCenter()
    {
        // used to enable miniball to access vertex pos info
        struct VertexAccessor
        {
            // iterator type for iterating over vertices
            typedef std::vector<T>::const_iterator Pit;
            // it type for iterating over components of vertex
            // (pointer is used to iterate over members of class here)
            typedef const float* Cit;
            // functor that miniball uses to get element iter based on vertex iter
            Cit operator()( Pit it ) const
            {
                return &it->pos.x;
            }
        };

        // solve the minimum bounding sphere
        Miniball::Miniball<VertexAccessor> mb( 3,vertices.cbegin(),vertices.cend() );
        // get center of min sphere
        // result is a pointer to float[3] (what a shitty fuckin interface)
        const auto pc = mb.center();
        const Vec3 center = { *pc,*std::next( pc ),*std::next( pc,2 ) };
        // adjust all vertices so that center of minimal sphere is at 0,0
        for( auto& v : vertices )
        {
            v.pos -= center;
        }
    }
    float GetRadius() const
    {
        // find element with max distance from 0,0; that is our radius
        return std::max_element( vertices.begin(),vertices.end(),
                []( const T& v0,const T& v1 )
                {
                    return v0.pos.LenSq() < v1.pos.LenSq();
                }
        )->pos.Len();
    }
    std::vector<T> vertices;
    std::vector<size_t> indices;
};'computer graphics > 3D Graphics' 카테고리의 다른 글
| [3DGraphics] 16. Point lights (0) | 2022.09.09 |
|---|---|
| [3DGraphics] 15. Gouraud shading (0) | 2022.09.09 |
| [3DGraphics] 13. Geometry shader (0) | 2022.07.24 |
| [3DGraphics] 12. Vertex shader (0) | 2022.07.24 |
| [3DGraphics] 11. Z-buffer (0) | 2022.07.15 |